This page covers more in-depth details about GARAGINATOR and can be used as a reference.
👁️ Overview #
GARAGINATOR is comprised of a WiFi module, relays, and various power and control circuitry. It also has multiple LEDs which act as indicators for various things.
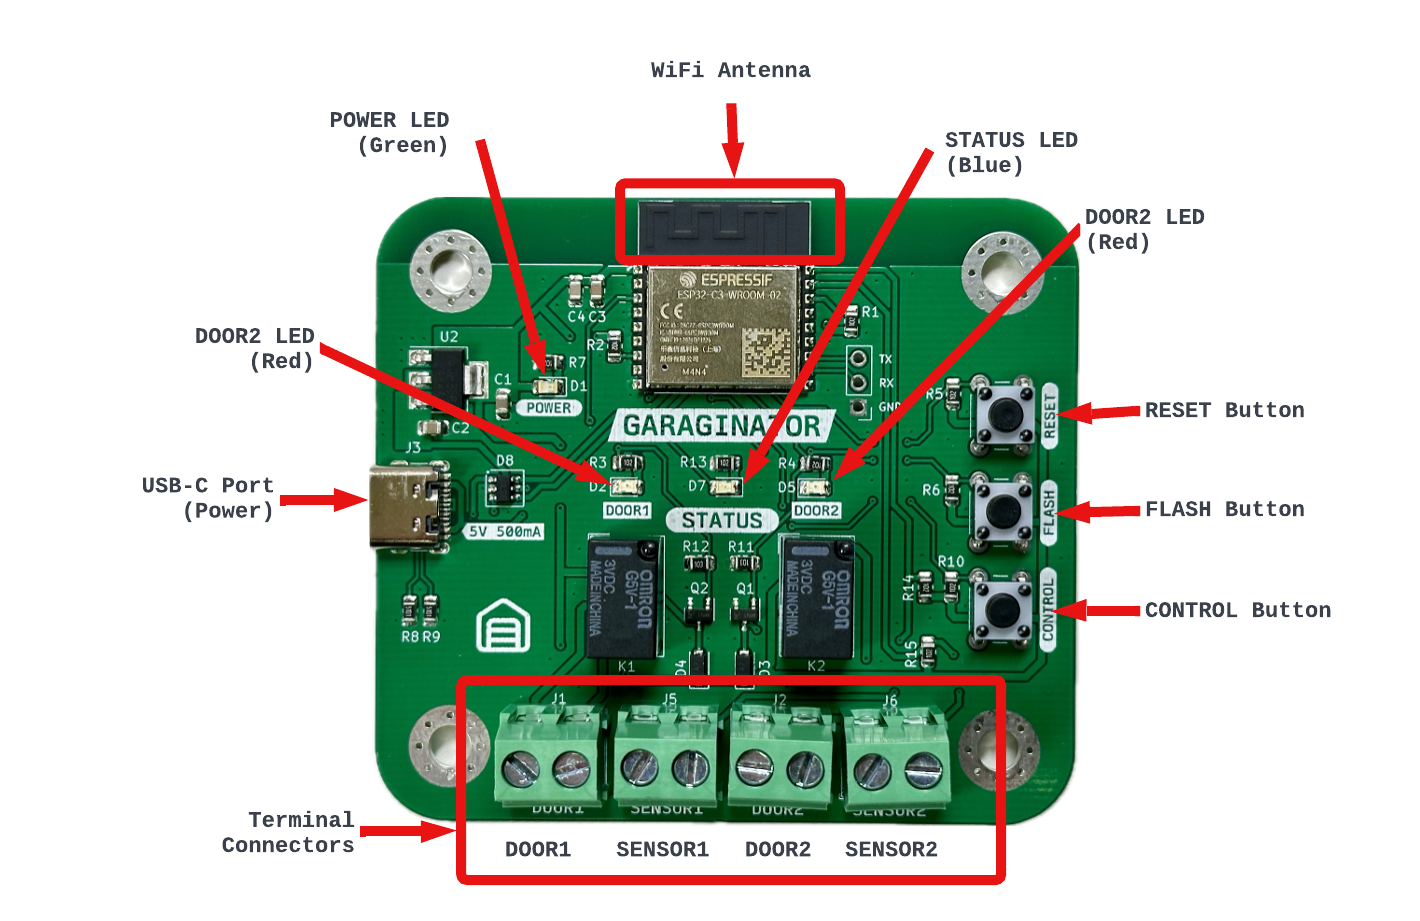
Terminal Connectors
The terminal connectors are where GARAGINATOR interfaces with your garage door opener and whatever sensors are in use. Use a small flat-head screwdriver to loosen/tighten.
CONTROL Button
This button can be used for changing the wifi credentials, changing the door/sensor configuration, unpairing from Home and factory resetting. To read more check out the section about Config Mode.
RESET Button
Pressing this will reboot GARAGINATOR. The device won’t start back up again until the button is released.
FLASH Button
Only used for reprogramming or upgrading. Keep held down while pressing and releasing RESET to boot GARAGINATOR into programming mode.
USB-C Port
Connect a standard USB-C cable to power GARAGINATOR
POWER LED
Lights up when power is connected, and the onboard regulator is operating correctly.
DOOR1/DOOR2 LEDs
These LEDs light up red when the garage door is being operated. When the LED turns on, the associated relay should also “click”.
STATUS LED
This LED does many different things depending on the context, see the dedicated section about this LED.
🛜 WiFi #
GARAGINATOR can connect to almost any 2.4GHz 802.11b/g/n WiFi network using WPA/WPA2/WPA3 auth modes.
If your SSID is hidden, you can use manual SSID entry when setting up GARAGINATOR.
GARAGINATOR does not require access to the internet, so it can be restricted if desired.
⚡️ Wiring #
⚡️⚡️⚡️WARNING⚡️⚡️⚡️: before doing any wiring, you should disconnect your opener from power, or turn off power at the breaker
GARAGINATOR should work with almost any Chamberlain/LiftMaster units, unless it has a yellow LEARN button and was made after 2011. If your opener uses Security + 2.0 it will not work.
Brands other than LiftMaster/Chamberlain have not yet been tested with GARAGINATOR, however if your opener can be operated by forming a dead short across a pair of it’s terminals (usually Red and White) then it should work. Consult your opener’s manual to get a better understanding of how it operates.
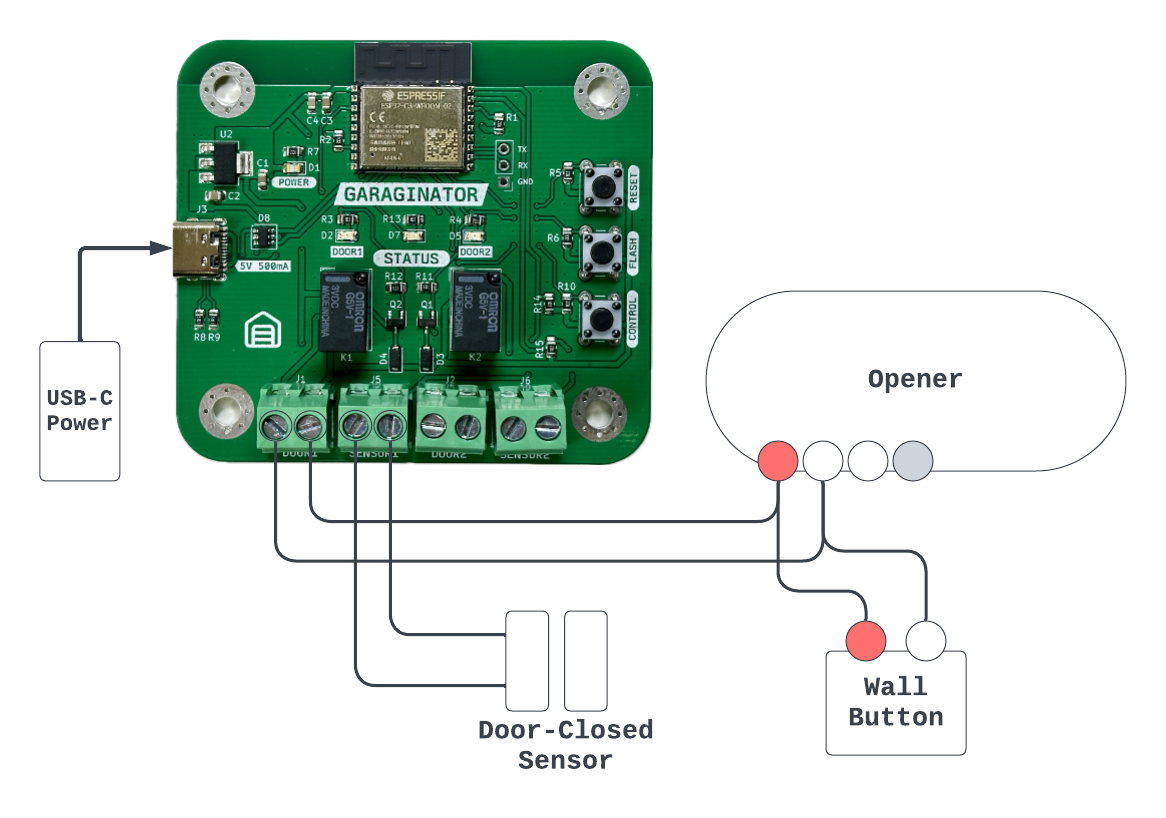
🔌 Wiring Steps #
- Disconnect your opener from power
- Connect wires from the Red/White terminals on your opener to your chosen DOOR terminal on GARAGINATOR
- Note: It doesn’t matter which way round you connect the wires to GARAGINATOR
- If desired, wire your existing wall button in parallel with GARAGINATOR’s DOOR terminal
- Note: It usually DOES matter which way round the wires are connected to the wall button, so be sure to keep it the same way around
- Connect your sensor wires to the SENSOR terminal on GARAGINATOR (again, doesn’t matter which way round)
If your opener doesn’t have Red/White terminals or wires, you can trace which terminals your wall control is attached to, and piggyback off those. Consult your opener’s manual to understand better which terminals are for commanding the door.
Check the compatibility page for more info.
🔥 Electrical Characteristics #
GARAGINATOR is designed to momentarily short 24V contacts. It is not designed to switch AC loads such as lights or fans etc. The parts used are theoretically capable, but shouldn’t be used for anything other than commanding garage door openers.
GARAGINATOR uses Omron G5V-1-DC3 relays. The maximum switching voltage is
60VDC, however GARAGINATOR has only been tested with 24VDC.
DO NOT connect AC power to any of GARAGINATOR’s terminals.
⚙️ Config Mode #
Config mode is a rudimentary “menu” system and is indicated by the STATUS LED. Config mode is used if you want to:
- Erase wifi credentials without unpairing
- Unpair GARAGINATOR
- Change Door/Sensor configuration
➡️ Entering Config Mode #
- Hold the CONTROL button until STATUS begins blinking very rapidly
- Immediately let go when the rapid blinking starts (holding for longer than 10 seconds will cause a Factory Reset!)
- You are now in the config mode “menu”
- The number of times STATUS blinks indicates which “menu” option is selected.
- Navigate the menu by pressing CONTROL. Once you reach option 5, the menu will restart from option 1
- To choose/activate the selected option, hold CONTROL again until STATUS rapidly blinks, then release. Your chosen option should be carried out.
| Blinks | Description |
|---|---|
| 1 | Exit Config Mode |
| 2 | Reboot GARAGINATOR |
| 3 | Launch GARAGINATOR’s private wifi network to reconfigure wifi, or change Door/Sensor settings |
| 4 | Unpair GARAGINATOR from Home. You shouldn’t ever need this, since removing GARAGINATOR from Home will cause it to unpair, but in case GARAGINATOR is gone from Home, but STATUS still incicates that it is paired (solid on) then you can use this option to clear pairing data. |
| 5 | Erase wifi credentials, but keep pairing information. |
You can exit Config Mode by either selecting option 1, or just pressing the RESET button on GARAGINATOR.
💡 STATUS LED #
This table explains what the STATUS LED is trying to communicate during normal operation.
| Pattern | Description |
|---|---|
| Solid on | Everything is OK! GARAGINATOR is connected to wifi and successfully paired |
| 2 quick blinks | Connected to wifi but not paired (ready to pair) |
| 1 blink | Not connected to wifi, join the GARAGINATOR-Setup wifi to configure |
| Rapidly blinking many times per second | About to enter Config Mode or about to Factory Reset. You are probably holding the CONTROL button |
🔄 Factory Reset #
Factory resetting GARAGINATOR will:
- Remove all pairing information
- Remove all wifi information
- Remove all door/sensor configuration
To factory reset GARAGINATOR, press and hold the CONTROL button until the STATUS LED begins blinking very rapidly (many times per second). Keep the button held until the STATUS LED turns completely off (which takes about 10 seconds).
GARAGINATOR is now ready to setup again as if it were brand new. You can follow the Getting Started guide to get going.
Disclaimer #
Use of GARAGINATOR is at your own risk. Remote garage door openers should only be used while in direct view of the door itself. The owner/operator of this website cannot be held responsible for any loss or damages that may result from the use of GARAGINATOR.