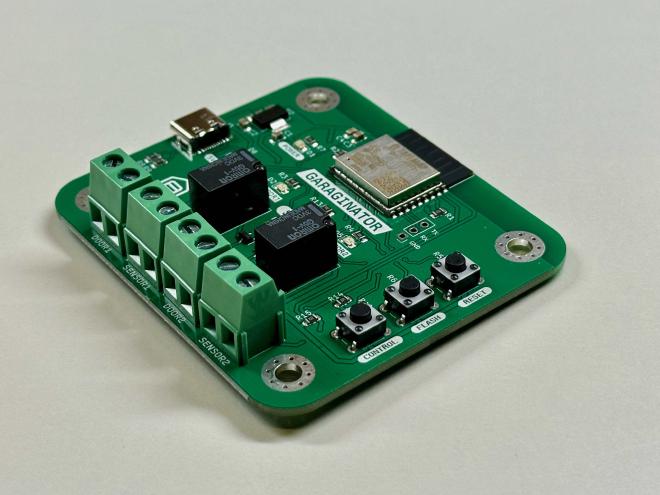
GARAGINATOR: Getting Started

Table of Contents
This page has all the information needed to set up and use GARAGINATOR v1.2.
✅ Prerequisites #
Before starting, you will need a few things:
- Read the disclaimer
- Your WiFi network name and password
- A mobile device or computer
- Decide if you will use sensors to detect if the doors are open or not
- Decide where you will mount the device
⏩ Quickstart #
If you want to speedrun the setup:
- Plug GARAGINATOR in via its USB-C port
- Join its captive WiFi network (GARAGINATOR-Setup)
- Configure your WiFi network
- Choose your door/sensor configuration
- Pair GARAGINATOR with your Home app
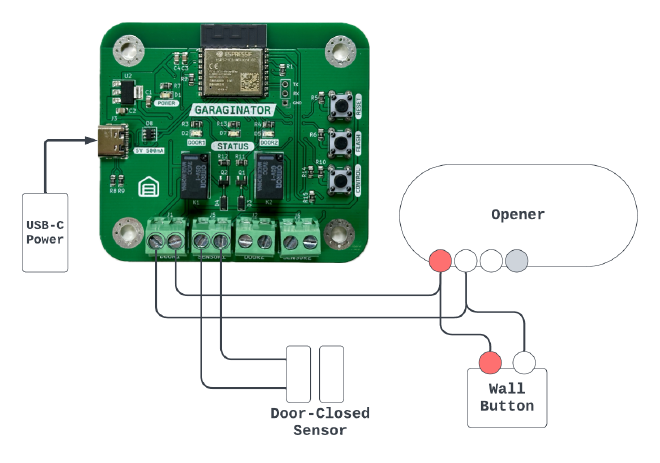
- Connect wires from the DOOR1 and/or DOOR2 terminals of GARAGINATOR to your opener’s red/white terminals
- Connect in parallel with your existing door button if desired
- Connect your door-closed sensors to the SENSOR1/SENSOR2 terminals
- Enjoy!
Setup #
Before mounting GARAGINATOR or wiring it to your garage door opener, it needs to be set up and configured.
🛜 Setup WiFi #
- Power on GARAGINATOR by plugging in a USB-C plug. Almost any wall adapter can be used, as long as it can produce 5V and 500mA
- If WiFi is not configured yet, GARAGINATOR will automatically start up its own mini WiFi network called
GARAGINATOR-Setup. Connect toGARAGINATOR-Setupwith your phone, tablet, or computer - GARAGINATOR’s initial configuration screen should automatically pop up on your device
- If nothing pops up, open a browser and navigate to
http://192.168.1.1
- If nothing pops up, open a browser and navigate to
- Select your WiFi network name from the dropdown, enter the password, and click
Connect - If the connection was successful, you will be presented with the door configuration screen.
🚪 Setup Doors/Sensors #
GARAGINATOR supports up to 2 openers either with or without door-closed sensors.
🤝 Pairing #
GARAGINATOR has only been tested to work with Apple Home, although it should be possible to pair it with any system that supports the HomeKit protocol such as Home Assistant. YMMV.
📡 Pairing steps #
GARAGINATOR indicates that it is ready for pairing by flashing the STATUS LED
twice rapidly with 2 seconds between bursts. Ensure you are seeing this pattern
before attempting to pair. More info about the STATUS LED can be found in the
GARAGINATOR User Guide.
- Open the Home app
- Click the plus button and Add New Accessory
- Either scan the included QR code, or click More Options and choose GARAGINATOR from the next page
- Enter the included pairing code
- GARAGINATOR should be added to your Home
After pairing, verify that GARAGINATOR is responding to commands correctly by toggling the doors open and closed a few times. You should see a red LED light up, and hear an audible “click” from the relay.
If everything is working as expected, you should move on to wiring!
⚡️ Wiring #
⚡️⚡️⚡️WARNING⚡️⚡️⚡️: before doing any wiring, you should disconnect your opener from power, or turn off power at the breaker
GARAGINATOR should work with almost any Chamberlain/LiftMaster units, unless it has a yellow LEARN button and was made after 2011. If your opener uses Security + 2.0 it will not work.
Brands other than LiftMaster/Chamberlain have not yet been tested with GARAGINATOR, however if your opener can be operated by forming a dead short across a pair of it’s terminals (usually Red and White) then it should work. Consult your opener’s manual to get a better understanding of how it operates.
🔌 Wiring Steps #
- Disconnect your opener from power
- Connect wires from the Red/White terminals on your opener to your chosen DOOR terminal on GARAGINATOR
- Note: It doesn’t matter which way round you connect the wires to GARAGINATOR
- If desired, wire your existing wall button in parallel with GARAGINATOR’s DOOR terminal
- Note: It usually DOES matter which way round the wires are connected to the wall button, so be sure to keep it the same way around
- Connect your sensor wires to the SENSOR terminal on GARAGINATOR (again, doesn’t matter which way round)
If your opener doesn’t have Red/White terminals or wires, you can trace which terminals your wall control is attached to, and piggyback off those. Consult your opener’s manual to understand better which terminals are for commanding the door.
Check the compatibility page for more info.
🪄 Sensors #
GARAGINATOR considers a door “closed” if the attached sensor forms a closed circuit.
The recommended way to add sensors to your door is with a magnetic reed switch such as these you can buy on Amazon (just make sure they are Normally Open (NO)) but you could also use another type such as tilt switches.
😢 Using without sensors #
Using GARAGINATOR with sensors is recommended and leads to a better experience, however you can choose not to use sensors during initial setup.
In no-sensor mode, when you tell GARAGINATOR to open or close the door, it will simply wait 5 seconds, and then report the state that you asked for.
What this means is that the state reported via Home could be out of sync with the real state of the door if you operate the door without using GARAGINATOR.
If you are using no-sensor mode, you can still do all the normal things like open-late notifications, however it is up to you to ensure that the door state doesn’t get out of sync with GARAGINATOR’s reported state.
Finishing Up #
Once GARAGINATOR is powered up, connected to wifi, paired to your Home, and wired to your opener you should consider mounting it near the opener (for shorter wire runs).
An STL file for a mountable enclosure will be made available soon for those folks with 3D printers. Otherwise you can simply mount garaginator directly using its mounting holes.
Happy GARAGINATING!
Disclaimer #
Use of GARAGINATOR is at your own risk. Remote garage door openers should only be used while in direct view of the door itself. The owner/operator of this website cannot be held responsible for any loss or damages that may result from the use of GARAGINATOR.
